
My name is Kimberly, a self-professed Prairie Love Knits addict. I began sewing with knits and discovered PLK at the beginning of the pandemic, and I haven’t looked back. I began my sewing journey nine years ago with quilting, and I would consider myself to be an intermediate level quilter. I have had the privilege of being a strike sewist for PLK in the past, and simply love the quality and detail of Sharon’s work and her products. I was so excited to have the opportunity to test Sharon’s very first quilt pattern!
What a fun take on a traditional quilt look. This is my first time trying a pattern with quarter square triangles, and I love all the cutting and piecing!
Fabric Selection

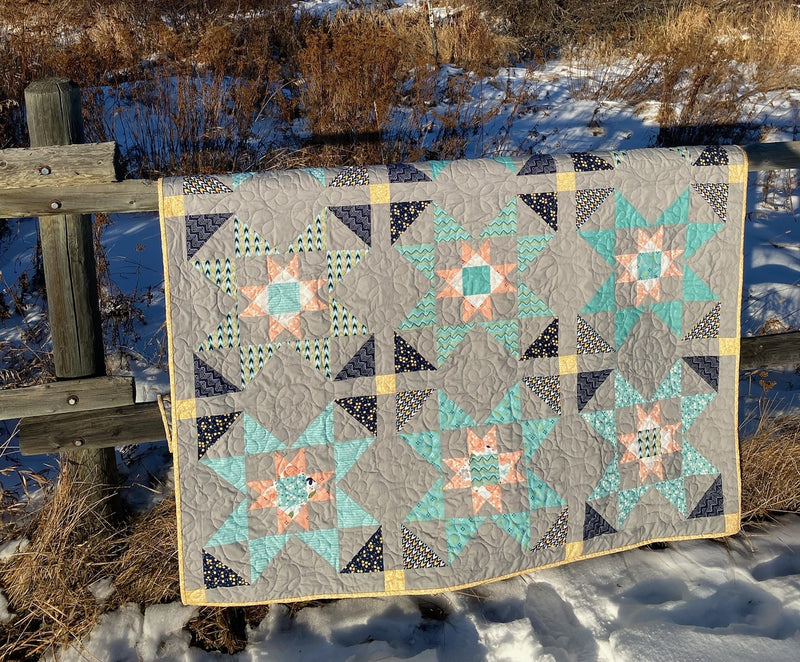
For this pattern, I opted to do a large throw in the “Limited” version, using a fat quarter bundle that I had on hand. The bundle had four distinct color groupings that I was able to assign to each of the required fabrics (Fabrics 1-4). To round out my fabric choices, I popped into Prairie Love Knits and picked up a dainty yellow floral for my cornerstones and binding, as well as a soft, neutral grey for my background pieces.
Cutting
To cut my fabric, I used my rotary cutter and various quilting rulers on a self-healing cutting mat.
I grouped my navy prints as Fabric 1, my turquoise prints as Fabric 2, my white prints as Fabric 3, and my pink prints as Fabric 4. As I mentioned, I cut my cornerstones out of the yellow floral, as well as the binding. All of the background pieces were cut out of the soft grey.
The cutting charts in the pattern were very clear and easy to follow. After cutting each set of pieces, I stacked and labelled each of them.

Sewing Instructions
Hourglass Unit Assembly (QST)
To start, I marked the wrong side of each of my grey squares (block F) diagonally using a Pilot Frixion pen. I lined up each of these right side together with a pink square (block D). I pinned in place on either side of the drawn line and sewed a seam ¼” to either side of the line. I made sure to place my pins far enough away from the line that my foot would not run over them.

I used a ruler and my rotary cutter to cut along the line to separate the half square triangles. I pressed the seams towards the grey (towards F of the D/F block) and towards the white (towards G of the D/G block).

I stacked a pink/grey (D/F) block on top of a pink/white (D/G) block and nested the seams together, making sure that the pink triangles were not touching. I then repeated the process of drawing a diagonal line on the back of the squares (this time perpendicular to the existing seam), pinning, and sewing ¼” on either side of the line.

I cut the square along the drawn line with a ruler, then pressed the seam open on all QST. Using my 4 ½” square ruler (my smallest), I trimmed the blocks down to 3 1/2'” square by aligning the diagonal line on my ruler with the seam on the block.

Ensure the midpoint of the QST block is at the 1.75" mark from all four sides of the ruler.
For the large throw, I made 48 QST blocks.
Center Unit Assembly
This section was very easy to follow. I attached my grey squares (H) to two of my QST to make two separate rows. I pressed the seams towards the grey. For the center row I attached two QST to a blue square (E), and pressed the seams towards the blue.
 .
. 
When joining the rows, I started by nesting the seams between blocks, then pinned along the row to be sure they were perfectly lined up. I checked each row to make sure the seams were nicely aligned, and then pressed the seams open. I checked each block to ensure each measured 9 ½” square. For the large throw, I ended up with 12 units.


Flying Geese Assembly
To begin, I gathered my 12 grey squares (block B) and 48 turquoise squares (block C). On each of the grey squares, I used my Frixion pen to mark diagonal lines corner to corner.
TIP: If you are using a heat removable pen like the Frixion pen, the second line will disappear when you are pressing the seams after the first cut. You may want to use a pen that is not heat sensitive for this step.
 .
. 
I also marked a diagonal line on the wrong side of the turquoise squares, and then lined then up in opposite corners of the grey square.
 .
. 
Next, I sewed at ¼” on either side of the drawn line, then cut on the drawn line. I pressed the seams towards the turquoise triangles (this is where you may lose your drawn line with a heat sensitive pen; you can redraw it from the grey corner to the center of the blue triangle side). I lined up and pinned the next turquoise square (block C) on the marked line, sewed at ¼’ to either side of the line, and cut along the drawn line. I, once again, pressed the seams towards the turquoise triangles.


I trimmed each flying geese unit to 5” x 9 ½”, being vigilant to keep a ¼” seam allowance at the top of the block where the turquoise triangles overlap. This is very helpful for the upcoming piecing steps to get crisp points at the seams.

Block Corner Assembly
This step used block A of the grey (background) and block A of the navy (foreground). On the back of each grey square I marked diagonal lines in both directions. I pinned each square right sides together with a navy block, then sewed a ¼” seam on each side of the square.

I cut the blocks on the drawn lines with my ruler and rotary cutter, then pressed all seams open. I trimmed each block down to 5” square.
 .
. 
Block Assembly
For each 18” square, I gathered 4 of my grey/navy HST, 4 of my grey/turquoise flying geese units, and 1 center unit. For rows 1 and 3, I attached the HST to either side of the flying geese, with the grey of the HST joining up the turquoise side of the flying geese (as you can see from the photo below, I initially had these on backwards and had to seam rip and correct each of my row 1 and 3). I pressed each of these seams towards the HST. For row 2, I added a flying geese unit to each side of a center unit, and pressed the seams towards the center unit.

Next, I attached row 1 to row 2 by nesting the seams and pinning across. I found it helpful to sew with the flying geese unit facing up, so that I could watch to be sure my seam was crossing right at the point of the flying geese, to ensure a crisp point at the seam.
 .
. 
Finally I attached row 3 to the bottom of row 2. I flipped over the block and checked my seams to be sure no points were cut off, or too far from the seam, then I pressed the seams open.
Just like that, the blocks are done! I checked each one to ensure it was 18” square, and did some minor trimming as needed to be sure they were square.

Quilt Assembly
In the home stretch! I loved this section because all of a sudden your blocks become a cohesive quilt.
For the large throw size, I sewed together five yellow cornerstone pieces (I) with four grey rectangles (J) to make my sashing rows. I pressed the seams toward the grey rectangles.
To make the block rows, I sewed grey rectangles to either side of each 18” block, as shown in Figure 10 in the pattern, pressing the seams toward the center block.
To join my block and sashing rows, I nested the seams of the cornerstone pieces and the edge of the blocks. I also pinned across the grey rectangle to keep everything securely in place.

I pressed each seam open as I went, and repeated until all sashing and block rows were joined. After completing the quilt top, I gave the entire thing a good press and trimmed any rogue threads I noticed.
Finishing Your Quilt
For my backing, I chose a 60” wide fireside in soft grey. Fireside is soft and cozy, but makes much less mess than minky when cutting and sewing. I used the Jinny Beyer method for diagonal piecing to minimize the length of backing I needed to use. (Tutorial can be found by googling “Jinny Beyer diagonal backing”). I used fusible batting tape on the back of the fireside along the diagonal before I cut the fabric. I did this because fireside does have some stretch to it, and it is being cut on the bias. I stitched the backing pieces together using a ½” seam allowance and pressed the seam open.
I am fortunate to have access to a longarm quilting machine, and quilted the top, batting, and backing using a daisy themed pantograph.

After quilting, I laid my quilt out on the floor to square it up.


To prepare my binding, I joined the binding strips with a diagonal seam, to distribute the bulk of the seam across the binding. After joining all the strips, I pressed each of the seams open, then pressed the strips in half with the wrong sides together.
 .
. 

I prefer to hand stitch my binding to finish it off, so I started by machine stitching the binding to the front of my quilt. I started in the middle of one of the long sides, leaving a 10” tail of binding. I lined up the raw edge of the binding with the raw edge of the quilt, and stopped ¼” away from the corner. I folded a mitered corner and continued stitching down the next side. I continued around the edge of the quilt until I was approximately 10” from my starting point. Next, I trimmed the binding strips so that they were overlapping by 2 ½” (my binding width), and joined them with a diagonal seam in the same way as earlier. I checked that this piece of binding laid flat once the quilt was smoothed out. Finally, I sewed this section of binding to the quilt.

For my last step, I folded the binding around to the back of the quilt, and attached with a whipstitch. For a video tutorial of attaching binding, check out this video from Jenny Doan. (It is a long, but thorough tutorial!)
And it is finished!
I absolutely love how this quilt turned out! The instructions were thorough, but concise, and very easy to follow. The cutting charts were simple and organized, and there were plenty of diagrams throughout the instructions. No matter what your experience level, this pattern is a must try!
0 comments